Friday, July 29, 2016

101 Patchwork Patterns Block 8 Pinwheels

Thanks to all who visited and commented during the Summer Sensations Blog Hop. I'm glad everyone liked the placemat tutorial. If you missed it, you can see it here. I had so much fun with the hop that I've signed up to join Marian of Seams to Be Sew again in October for the Eerie Nights Blog Hop, starting October 20th.

Halloween is my favorite holiday to decorate for. I'll have a new project to share on my day. It's easy, and will work in lots of colorways, not just Halloween!

101 Patchwork Patterns - Block 8 Pinwheels


Download the Pinwheels block.

Here is another block that is made up of units we've done before. Block 4, the Churn Dash, includes a photo tutorial of making half square triangle blocks. After you make the pinwheels the block is together in no time!


Here is a drawing of the quilt including today's block. Don't forget, you can position your 9 inch blocks any way you would like within this round.

I apologize for not sewing the block today but I've been a bit under the weather. Hopefully I'll bounce back soon and be running my sewing machine at full speed.

Thanks for stopping by,
Mary


Tuesday, July 26, 2016

Summer Sensations Blog Hop

Welcome to my home on the internet.

I have an easy project to share that can be made from a set of 6 fat quarters. If you’re like me you pick up appealing bundles and then get home and don’t know what to do with them. Well, I came up with a set of placemats. I have no idea what the fabric I used is but I think it’s a Moda line from about 3 years ago.

I actually started off with a different project, made it, and then changed my mind. As I looked at the posts last Thursday and Friday I realized my project wasn’t summer at all. I think what I’ve got here fits much better.

My Summer Sensational Project

First, choose a focus fabric from your fat quarters. I am hoping that your fat quarter will measure 18” wide by at least 20” long. They do vary a bit, especially in the length. The cutting instructions are for the horizontal measurement to be 18”.

CUTTING:

Focus Fabric fat quarter:

From the fat quarter you have chosen as your focus fabric, cut 4 strips that measure 4.5” x 18”.

The remaining piece (grey) is scrap.


From EACH of the 5 coordinating fat quarters:

Cut 3, 2-7/8" strips. Cut these into a total of 14, 2-7/8" squares.

From 4 of the 5 coordinating fat quarters:
Cut 1, 4.5" x 8.5" rectangle.

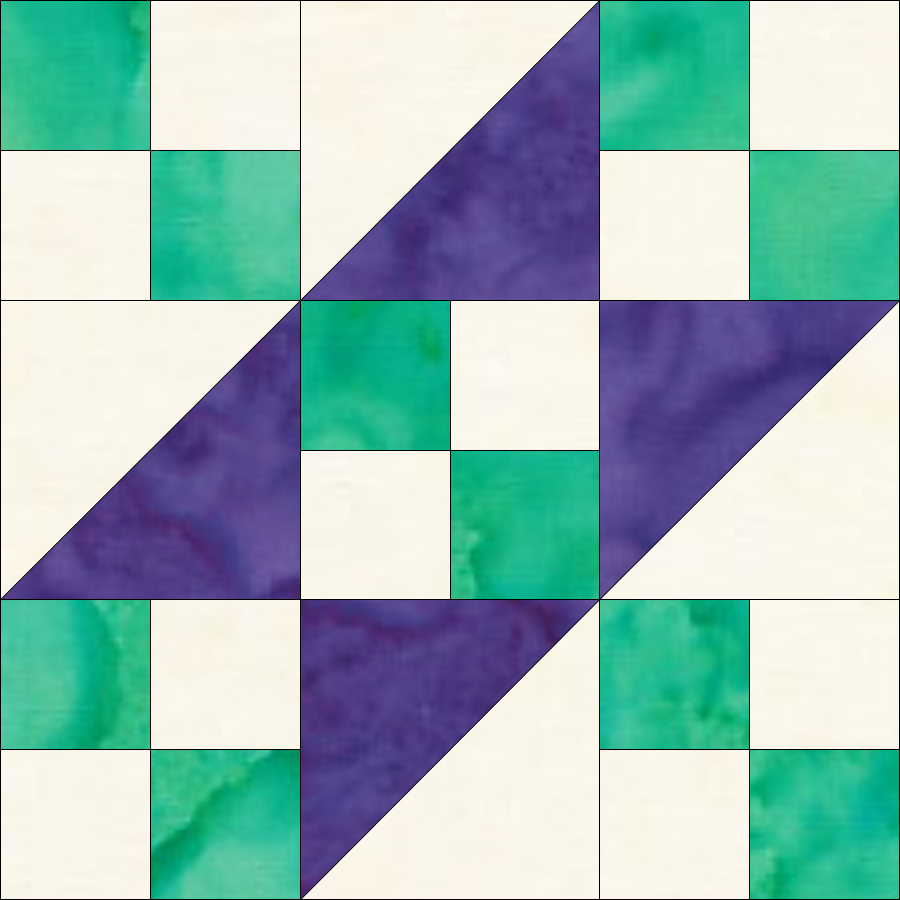
Using the 2-7/8” squares, make half square triangle blocks with random pairs of squares.

Draw a line from corner to corner, shown by the solid line.
Sew 1/4" on either side of the drawn line, shown by the dashed lines.
Press the seam allowance towards the dark fabric.
(See the photo tutorial for making half square triangle blocks.)


Now, lay out your half square triangle blocks in a 4 x 7 grid. arrange the fabrics as random or as organized as you would like.

For Each Placemat:

Sew pairs together till you have 4 rows.
Sew rows together.
Add the 4.5" x 8.5" side piece.
Add the 4.5" x 18" piece to the long edge.


Here you can see I pressed the row allowances open because it was getting a little thick where the blocks joined.

Cut a piece of batting about 1" bigger than the placemat.
Place the backing fabric, cut 12" x 18", right side up, centered on the batting.
Place the assembled placemat, right side down, on top of the backing.
Sew all around the edges of the placemat at a quarter inch, leaving about a 4" gap to turn through.


Somewhere I learned that an easy way to mark your opening so you don't sew through it is to use 2 pins on either side to remind you.


To help make those corners turn easily, clip the point away, as shown here.


After turning the placemat, I used some long flower head pins to loosely hold it together.

I then sewed around the edge at a scant 1/4". Check the opening for turning and make sure it has been sewn closed.


Here is a photo of the finished placemat after quilting and washing. I love the way it came out! So 6 fat quarters made 4 placemats. I added 2/3 yard of Kona Cotton Ivory for the backings.

Thank you so much for visiting me today. Please take a look at my ongoing Block of the Week program based on Ruby Short McKim’s classic book, 101 Patchwork Patterns here: http://www.seacoastquilter.net/p/101-patchwork-patterns.html.

There are 2 other bloggers participating in today’s hop – please visit and enter the rafflecopter drawing after leaving a comment. We love feedback!

And our organizer and cheerleader, Marian, at
Seams To Be Sew.


Here is the Rafflecopter to enter the drawing:

a Rafflecopter giveaway

Thanks so much for visiting.
Mary

Friday, July 22, 2016

101 Patchwork Patterns Block 7

Road to California


I almost forgot to publish the block this week. This is called Road to California, Jacob's Ladder, or several other names. It is also colored or configured differently, but with the same name. I found a nice article about the origin of the block at a site named Patterns From History.

This block is made from strips like we did in Block 1, and half square triangle blocks like we've made several times. I forgot to take pictures as I sewed the block, sorry. Please ask if you have any questions making it.


Here is where we are at on building our quilt. I can't wait to get the first round done.


Don't forget to join us on the Summer Sensations Blog Hop. The Fat Quarter Shop has given a $25 gift certificate to be awarded each day of the hop. Visit our host, Marian at Seams To Be Sew, for the schedule and winner information. My day is coming up on Tuesday. Look for a quick easy project that would look great on your Summer table, inside or out.

Have a good weekend!
Mary


Monday, July 18, 2016

Summer Sensations Blog Hop

Starting this Thursday through next Tuesday will be your chance to visit 12 bloggers plus our fearless leader on this journey, Marian at Seams To Be Sew. Today Marian said she will have a free pattern every day, and each blogger will be sharing a project on their day. So take a few minutes and see what each of these wonderful bloggers are up to on their day. My project is a quick and easy table topper that I hope you'll like.

The schedule is:


July 21
July 22
July 25
July 26
Also, the Fat Quarter Shop is giving a $25.00 gift certificate every day! So be sure and stop by for a chance to win.

Wednesday, July 13, 2016

101 Patchwork Patterns Block 6

It's been a warm several days here on the seacoast of New Hampshire. We may even reach into the nineties on Friday. It's a good time to stay inside with air conditioning and sew. I continue to try and spend at least an hour a day at my machine. It doesn't always happen but I'm trying. There's always so many interesting things to do with your spare time. I hope you get time to sew.


Here is the next block pattern, called Maple Leaf. This block has half square triangle units, which we've made in blocks 3 through 5. I did not take photos of those this time. The interesting step for this block is the stem. It could be appliqued on top of a background square. I've chosen to piece it and I see in the photo I didn't get it quite centered. Oh well!


After cutting one of the background 3-7/8" squares in half diagonally, I fold and press to get a center line mark on the cut edge. I have also folded the stem piece in half to mark it. Line up the centers and sew at a 1/4". Press towards the dark (my photo shows towards the light but I fixed it before sewing it into the block).


Repeat with the other half square triangle and last step's piece.


Sew a 1/4" seam along the stem and press. Because we've inserted a piece into the diagonal of the 3-7/8" square we need to trim it to a 3-1/2" square.


Place your ruler so that the 3-1/2" mark aligns with the middle of the stem shape. Before you cut, check that the lower left corner is more than 3-1/2" so there will be room to trim the other side (photo below).


Turn the fabric unit around and place the 3-1/2" mark at the corner, where indicated. Trim the right and upper edges, leaving you with a 3-1/2" square with the stem in the middle.


I sew with a fan blowing on the pressing board. I photographed this with the lower left corner flapping in the breeze, hence blurry. I couldn't have timed that if I wanted to! Now you can make your block using squares, half square triangle squares and the stem square.


Here's how the quilt is coming. One more block and we're half way through the first round. I like medallion style projects because you can assemble them as you go. 

If you've made any of the blocks so far, please share them on Facebook. I'd love to see what you are making!

Thanks,
Mary

Monday, July 11, 2016

Rowing Again, and Summer Sensations almost here!

Hi!

My friend and I went to get our Saturday Sampler blocks this past Saturday (7/9) and decided to stop in at some other shops in the area to get their Row patterns. Do you have a local shop that does Saturday Sampler? I know the idea goes back 10 years or so and I started going to Knight's Quilt Shop in 2012 after my shop closed in 2011. You purchase your first block in January, bring back the sewn block the next month and get the kit free. If you don't get it sewn, or can't go on the correct Saturday, you don't get it free, it's $5. Little Lamb Quilt Shop always did the first Saturday. Knight's is on the second Saturday. I've got 4 years worth of blocks done and still haven't assembled a top. I'll get to it!
After getting our blocks and row pattern at Knight's, we headed north along the New Hampshire/Maine border. We stopped at four other shops:

Saltwater Fabrics, South Berwick, ME. This one is titled "The Perfect Sewing Room." You can see the ocean out the windows - so clever!

The Village Quilt Shop, Berwick, ME.

Sanford Sewing Machines in Sanford, ME.

Footprints Quilt Shoppe in Rochester, NH.

That brings me to 10 row patterns collected so far. People are turning in completed quilts and winning 25 fat quarters already. I am saving the rows for future sewing. I've been scanning them as I get them so I will be able to find them when ready to sew.


The other news today is the schedule for the Summer Sensations Blog Hop that I'm participating in has been sent out to participants. My turn is on Sunday, July 24. I have a quick and easy project I'll be sharing. Please visit the wonderful Marian at Seams to be Sew for more information.

I'll be back with the next block for 101 Patchwork Quilts later this week.

Thanks for visiting,
Mary

Thursday, July 7, 2016

101 Patchwork Patterns - Block 5

Good afternoon,

I meant to post this block yesterday but went out shop hopping for the Row by Row Experience. We just went to 1 shop in Massachusetts and then swung back up and stopped at 4 New Hampshire shops. So, a good day for collecting row patterns. We went to:
Portsmouth Fabric Company, Portsmouth NH

Red Barn Sewing & Yarn, Merrimac MA

D & D Sewing and Quilting, Plaistow NH

Pintuck & Purl, Exeter NH

Stitched in Stone, Kingston NH

I've downloaded the photo reference pages from https://www.rowbyrowexperience.com/ and we've noticed a number of rows are patriotic. Wouldn't it be fun to do a quilt with just the various patriotic themed rows? 

We also found a group of 6 shops in Western Massachusetts who's rows go together. This was designed by Valerie Morton. Take a look at this:
It will make for a long day trip but I hope we can do it. What a great idea! The shops are:

  • Bayberry Quilt & Gift Shoppe, Chicopee MA
  • Quilts & Treasures, East Longmeadow MA
  • Pumpkin Patch, Lee MA
  • Karen's Quilting Corner, Williamstown MA
  • Brookside Quiltworks, South Egremont MA
  • A Notion to Quilt, Shelburne Falls MA


101 Patchwork Patterns Block 5 Spool

This week's block is a simple spool of thread. You can make yours any color you want. I colored the block in Electric Quilt with blue but made it with red. The choice is yours! You may download the pattern here.

1. Make two half square triangle blocks with the 3-7/8" background and spool squares. I drew a line corner to corner on the beige side but it doesn't show in the photo because I used beige thread. So this side shows the two lines of stitching, a quarter inch either side of the drawn line.

Add the half square triangle units to the 3-1/2" spool squares. Clip the points once the rows of the block are sewn. 

Sew the two background and one thread 3-1/2" squares together. Press towards the background.

 Add the top and bottom spool rows to the center row. Press towards the center row.

And here you have your spool block completed.

My photos are taken on a Steady Betty block pressing board that I keep right next to the sewing machine. It's starting to look a little worn, but I've had it for five years and it gets a lot of use. I guess it's held up pretty well.

Here's what the quilt looks like now. I've worked ahead and have the rest of this size blocks chosen and drawn. Now to sew them and write the patterns! I've chosen two different basket patterns as the last block of this round. One is pieced and the other has an appliqued handle. So it will be up to you which to use. We will be able to assemble the top as we go. The spacer rows are added to make the measurements work out for the next round of blocks. Visually it will break up the blocks a bit as well.

Hope you are enjoying making these beginning blocks. Please contact me if you have any questions.

Thanks,
Mary