Wednesday, October 26, 2016

Eerie Nights Blog Hop

Hello, and welcome to the Eerie Nights Blog Hop. I hope you have been following along each day. We've seen some wonderful projects. Thanks to Marian at Seams To Be Sew for organizing this, and Amy at Sew Incredible Crazy for being our hostess. I'll share the full schedule at the bottom of this post. You can visit any time to see what everyone is up to!

If you have visited me before you may remember that my life turned upside down a few months ago with the death of my husband. I have been working on cleaning out our house in preparation to moving ever since. When I have something that I can sell and don't need, I've been parting with it. So I've left myself without a dining table. Oh well, I've got a fun table topper to share, and you'll just have to imagine it's nicely displayed!

You can download a pdf version of this pattern for future reference.


When I set the topper down on a kitchen island, this is what I got! My cat, Seamus, thinks everything is for him. And when I tried to move him, he turned his back! Good thing he's cute!


This is made with one block, and which is twisted to get the pattern. I started with paper pieced half square triangle units and proceeded from there.


Next, sew together pairs of half square triangle units.


 Now sew two pairs together, and pinwheel the center seam to reduce bulk.


Close up of the pinwheeled center of the block.


Next, make pairs of blocks, then sew together into blocks of 4 units.


You also need to make four corner units with 2 blocks and 2 plain squares.


To the above, add two plain rectangles. These extend beyond the blocks for now.


Following this diagram, assemble your blocks. The corner blocks get trimmed after you quilt, and before you apply your binding.


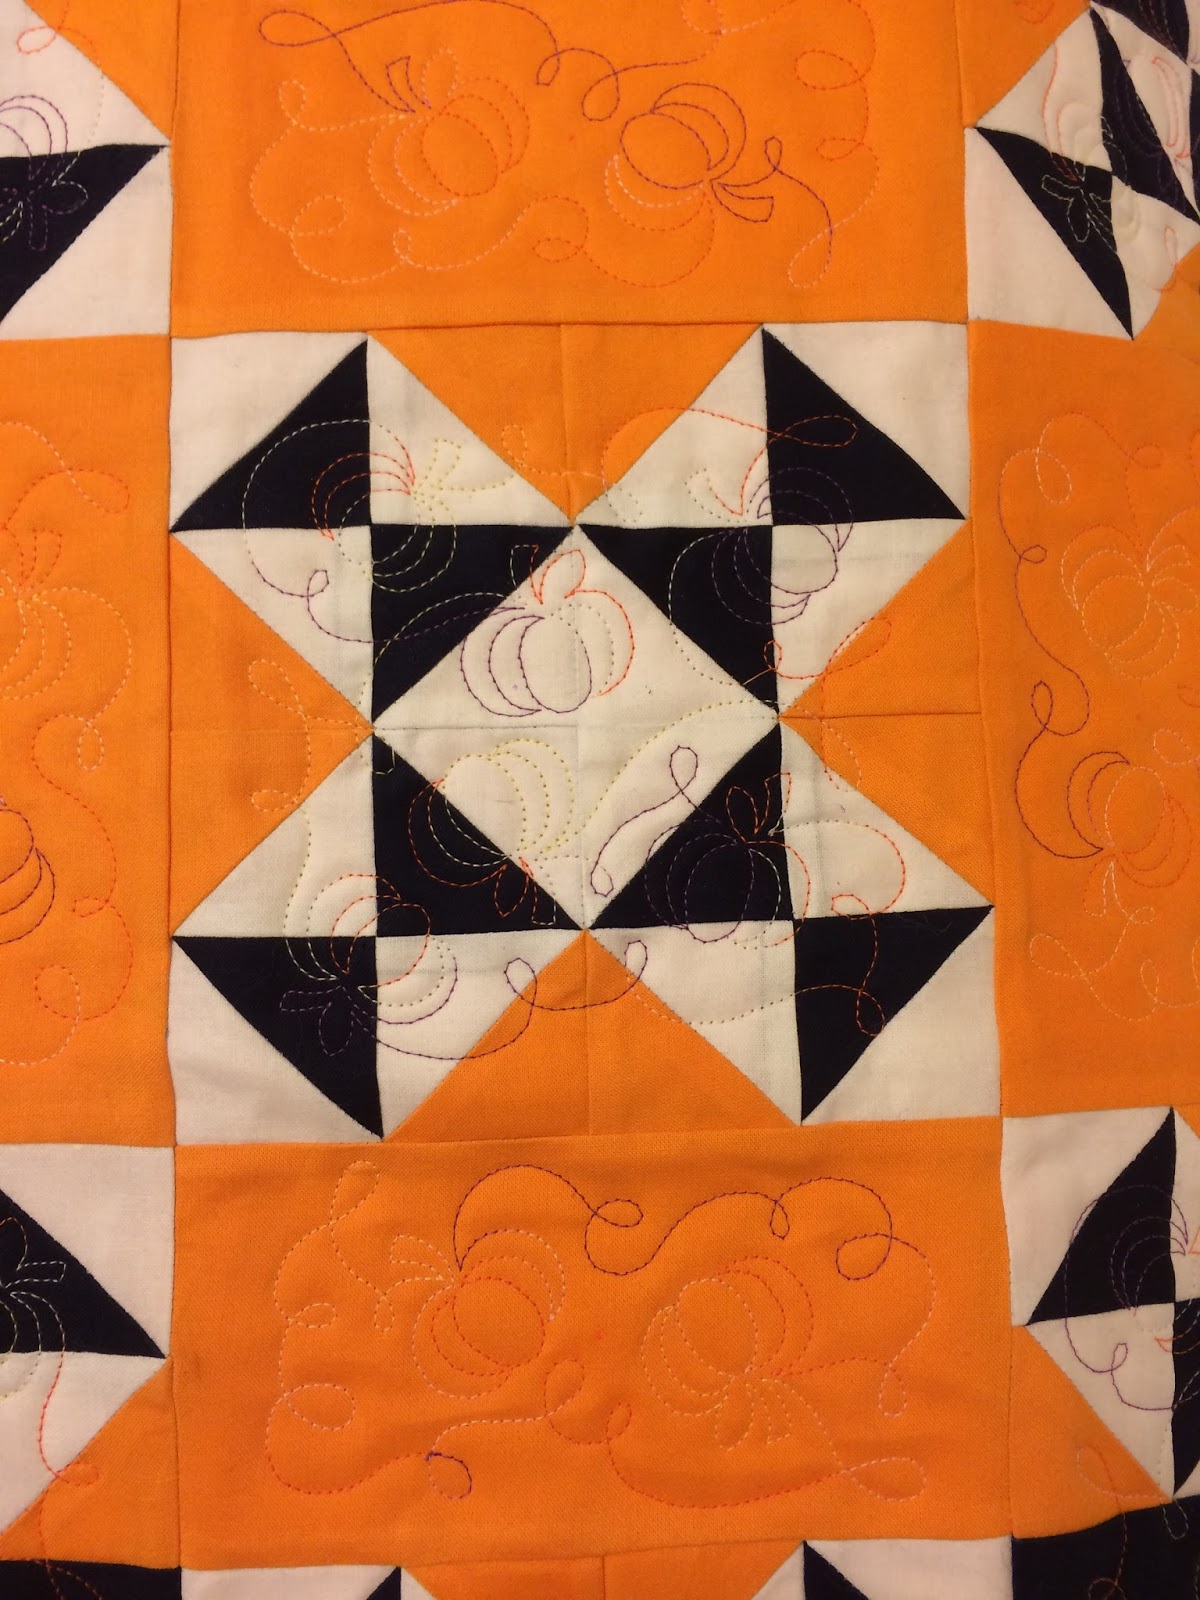
Closeups showing the quilting.


I used designs from a Continuous Line Halloween machine embroidery design pack from Embroidery Online with a variegated thread from Aurifil. I didn't realize the thread included white so it didn't work perfectly, but I like it.


After the quilting you will need to trim off the ears on the corners. Be careful to leave a quarter inch beyond the seam allowance with the neighboring block and at the intersection of the two rectangles.


When trimming around the rest of the topper, I used the center white line (that is at 3-1/4" on my 6-1/2" ruler) and checked that I had 1/4" beyond the points before cutting. 

I cut my binding 2" and sewed it at 1/4". This worked out a bit tight and made the corners (all 12 of them!!!) a bit hard to turn. I'm probably going to take it off and replace it with a 2-1/4" cut binding.

Finished size of the table topper is 24" diameter.

Eerie Nights Blog Hop Schedule:

20-Oct

21-Oct

24-Oct

25-Oct

26-Oct

27-Oct
                    YOU ARE HERE ===>>> Seacoast Quilter


28-Oct


If you have time it's fun to see everyone's projects. And of course, enter the prize drawings. I have a chance for you to win some of my favorite thread, Aurifil. Just leave a comment below and use the Rafflecopter to enter the drawing.

a Rafflecopter giveaway

Thanks so much for stopping by. I am doing a block of the week (or so) using the classic 101 Patchwork Patterns book by Ruby Short McKim rewritten into rotary cutting instructions. We are making a medallion style quilt and have completed one round. Take a look here, or click the tab at the top of the page.

Enjoy,
Mary


Thursday, October 20, 2016

New England Quilt Museum & Eerie Nights

I went to the New England Quilt Museum in Lowell, Mass today. They have a monthly book group lunch meeting that includes a nonfiction title and a fiction title. The fiction today was Whiter Than Snow by Sandra Dallas. I've read several of her books but not this one. It sounded like an amazing story so it's gone on my list. The other book discussed today was 101 Patchwork Patterns by Ruby Short McKim. I was invited to speak a bit and show the quilt to date. It was very interesting to see the couple antique Ruby McKim quilts and some blocks that they have in their collection. I hadn't been to the museum in a while and I really should go more often. The exhibits are always incredible. The current exhibit that just opened today is America's Appliqued Quilts from the Christ Collection. If you are anywhere in the area be sure to see it.


Now, for the promised first part of 101 Patchwork Patterns quilt assembly. I have a step by step document to help, and it is pretty straight forward. If you have any questions, on any block or other instructions, please ask. I am always glad to help. I know what I write makes sense to me, but may not always make sense to you. I ran to one of my local quilt shops yesterday to pin the quilt up for a photo, and it looks like it needed pressing. I changed the arrangement from the drawing a bit to distribute the colors nicely.


The Eerie Nights Blog Hop started today. You can see the full schedule at Sew Incredibly Crazy. There are lots of great prizes and fun projects to see. My day is next Thursday, October 27. I've got a free pattern for you.

Thanks for stopping by. If you get your quilt center together please share a photo on Facebook. We'd all love to see it!

Mary


Monday, October 17, 2016

101 Patchwork Patterns Block 13

I've been extremely busy with one thing and another... you all know how it goes. And before you know it, a month has gone by. These past few weeks have been very busy with guild quilt shows. I've been to four. After back surgery in 2014 I had missed a couple years of shows so I've really enjoyed going to: Merrimack Valley Quilters, Belknap Mills Quilters Guild, Monadnock Quilters Guild and one of the two guilds I belong to, Cocheco Quilters Guild.

There are two area events left in this fall season, both the same weekend and both new events. The Connections Quilt Festival is in Nashua, NH, November 10-12. Also new to the area is a vendor only show at the Sturbridge Host Hotel in Sturbridge, MA, November 10-12. This is sponsored by Pinwheels and Friends who hold a spring event in Mt. Kisco, NY. This will be their first time in Sturbridge.

Also, I am participating in two fun events on Thursday, October 20. First, I am part of the Eerie Nights Blog Hop and Thursday is my day to share. I have a quick and easy table topper with a fall look. Lots of great prizes are up for grabs during the hop, too. And I'll be speaking at the New England Quilt Museum during their monthly book club lunch meeting on Thursday. Their books for the month are 101 Patchwork Patterns and Whiter Than Snow by Sandra Dallas. I have read and enjoyed several Dallas novels but not this one. Think I can read it by Thursday?

I have two blocks from 101 Patchwork Patterns to share today, and I'll be back in a day or two with the first assembly instructions for our quilt. I chose an all pieced block and an alternate block with a little bit of applique. Whichever you choose to make is fine, and this block will allow us to assemble the first round of our medallion style quilt. The choices are Steps to the Alter or Cherry Basket.

Download Steps to the Alter Pattern


First you need to cut the Piece A green squares in half diagonally. I use the lines on the cutting mat to help me get the cut right on the diagonal by laying the square with the corners on a vertical line and using the 45 degree line to make sure it is straight on the mat.


Next, I lay out the rows needed for half of the block. 


Then I glue baste the squares to each other so I can go to the machine and sew without worrying that squares are out of place.


Next, sew pairs of yellow and green rows together. 

Now make the brown and beige half square triangle unit, and using the other half of the brown square, make the other half of the block. 

At this point you can sew the yellow/green pieces and the beige/brown pieces into rows, or sew each half together. I chose to sew the halves together. As you can see here I pressed the seam allowances open on the yellow/green rows.


Sew the two halves of the block together and you are done. (Sorry, missed a photo of this step.) 

As an improvement I am working on setting up a photography station with better light. I've been checking other blog posts on the issue. These seem to be particularly dark and I apologize.


Download Cherry Basket Pattern


This is very similar to the Steps to the Alter block above. Your small blocks are half square triangles rather than simple squares. 


Sew the rows of the basket together just like you did before. Also, add the dark purple half square triangles to the background rectangles.


Next you'll sew the background/triangle pieces to the basket, first one side then the other. Make sure you have an overlap of the dark purple triangles at the bottom corner of the basket. Sew the half square of background to the bottom of the basket.


After cutting the 8-5/8" large square on the diagonal, press to mark the center. Also fold the applique handle in half and line up the folds when placing the handle. Be sure that the bottom edges of the handle will be caught in the seam allowance.


I used fusible web to trace the basket handle and fuse it to the background triangle. I used a machine blanket stitch to sew it. You can use any stitch you would like: straight, zigzag, blanket, even hand blanket stitching is fine. Whatever you want is what's right.

Sew the handle portion to the basket portion. They are not equal halves like the Steps to the Alter were. Check to make sure you have a 1/4 inch seam allowance on either end of the handle portion extending beyond the basket portion.

Quilt including block 13.

So that wasn't too bad, was it? Remember you only need to make one of the blocks unless you want to have a spare. Each round of the quilt layout uses a different size block to make the dimensions come out right. So the 12 or 13 9 inch blocks we've made will surround the large center block. 

Check back in a couple days for the first assembly instructions.
Thanks for visiting,
Mary