Wednesday, October 26, 2016

Eerie Nights Blog Hop

Hello, and welcome to the Eerie Nights Blog Hop. I hope you have been following along each day. We've seen some wonderful projects. Thanks to Marian at Seams To Be Sew for organizing this, and Amy at Sew Incredible Crazy for being our hostess. I'll share the full schedule at the bottom of this post. You can visit any time to see what everyone is up to!

If you have visited me before you may remember that my life turned upside down a few months ago with the death of my husband. I have been working on cleaning out our house in preparation to moving ever since. When I have something that I can sell and don't need, I've been parting with it. So I've left myself without a dining table. Oh well, I've got a fun table topper to share, and you'll just have to imagine it's nicely displayed!

You can download a pdf version of this pattern for future reference.


When I set the topper down on a kitchen island, this is what I got! My cat, Seamus, thinks everything is for him. And when I tried to move him, he turned his back! Good thing he's cute!


This is made with one block, and which is twisted to get the pattern. I started with paper pieced half square triangle units and proceeded from there.


Next, sew together pairs of half square triangle units.


 Now sew two pairs together, and pinwheel the center seam to reduce bulk.


Close up of the pinwheeled center of the block.


Next, make pairs of blocks, then sew together into blocks of 4 units.


You also need to make four corner units with 2 blocks and 2 plain squares.


To the above, add two plain rectangles. These extend beyond the blocks for now.


Following this diagram, assemble your blocks. The corner blocks get trimmed after you quilt, and before you apply your binding.


Closeups showing the quilting.


I used designs from a Continuous Line Halloween machine embroidery design pack from Embroidery Online with a variegated thread from Aurifil. I didn't realize the thread included white so it didn't work perfectly, but I like it.


After the quilting you will need to trim off the ears on the corners. Be careful to leave a quarter inch beyond the seam allowance with the neighboring block and at the intersection of the two rectangles.


When trimming around the rest of the topper, I used the center white line (that is at 3-1/4" on my 6-1/2" ruler) and checked that I had 1/4" beyond the points before cutting. 

I cut my binding 2" and sewed it at 1/4". This worked out a bit tight and made the corners (all 12 of them!!!) a bit hard to turn. I'm probably going to take it off and replace it with a 2-1/4" cut binding.

Finished size of the table topper is 24" diameter.

Eerie Nights Blog Hop Schedule:

20-Oct

21-Oct

24-Oct

25-Oct

26-Oct

27-Oct
                    YOU ARE HERE ===>>> Seacoast Quilter


28-Oct


If you have time it's fun to see everyone's projects. And of course, enter the prize drawings. I have a chance for you to win some of my favorite thread, Aurifil. Just leave a comment below and use the Rafflecopter to enter the drawing.

a Rafflecopter giveaway

Thanks so much for stopping by. I am doing a block of the week (or so) using the classic 101 Patchwork Patterns book by Ruby Short McKim rewritten into rotary cutting instructions. We are making a medallion style quilt and have completed one round. Take a look here, or click the tab at the top of the page.

Enjoy,
Mary


Thursday, October 20, 2016

New England Quilt Museum & Eerie Nights

I went to the New England Quilt Museum in Lowell, Mass today. They have a monthly book group lunch meeting that includes a nonfiction title and a fiction title. The fiction today was Whiter Than Snow by Sandra Dallas. I've read several of her books but not this one. It sounded like an amazing story so it's gone on my list. The other book discussed today was 101 Patchwork Patterns by Ruby Short McKim. I was invited to speak a bit and show the quilt to date. It was very interesting to see the couple antique Ruby McKim quilts and some blocks that they have in their collection. I hadn't been to the museum in a while and I really should go more often. The exhibits are always incredible. The current exhibit that just opened today is America's Appliqued Quilts from the Christ Collection. If you are anywhere in the area be sure to see it.


Now, for the promised first part of 101 Patchwork Patterns quilt assembly. I have a step by step document to help, and it is pretty straight forward. If you have any questions, on any block or other instructions, please ask. I am always glad to help. I know what I write makes sense to me, but may not always make sense to you. I ran to one of my local quilt shops yesterday to pin the quilt up for a photo, and it looks like it needed pressing. I changed the arrangement from the drawing a bit to distribute the colors nicely.


The Eerie Nights Blog Hop started today. You can see the full schedule at Sew Incredibly Crazy. There are lots of great prizes and fun projects to see. My day is next Thursday, October 27. I've got a free pattern for you.

Thanks for stopping by. If you get your quilt center together please share a photo on Facebook. We'd all love to see it!

Mary


Monday, October 17, 2016

101 Patchwork Patterns Block 13

I've been extremely busy with one thing and another... you all know how it goes. And before you know it, a month has gone by. These past few weeks have been very busy with guild quilt shows. I've been to four. After back surgery in 2014 I had missed a couple years of shows so I've really enjoyed going to: Merrimack Valley Quilters, Belknap Mills Quilters Guild, Monadnock Quilters Guild and one of the two guilds I belong to, Cocheco Quilters Guild.

There are two area events left in this fall season, both the same weekend and both new events. The Connections Quilt Festival is in Nashua, NH, November 10-12. Also new to the area is a vendor only show at the Sturbridge Host Hotel in Sturbridge, MA, November 10-12. This is sponsored by Pinwheels and Friends who hold a spring event in Mt. Kisco, NY. This will be their first time in Sturbridge.

Also, I am participating in two fun events on Thursday, October 20. First, I am part of the Eerie Nights Blog Hop and Thursday is my day to share. I have a quick and easy table topper with a fall look. Lots of great prizes are up for grabs during the hop, too. And I'll be speaking at the New England Quilt Museum during their monthly book club lunch meeting on Thursday. Their books for the month are 101 Patchwork Patterns and Whiter Than Snow by Sandra Dallas. I have read and enjoyed several Dallas novels but not this one. Think I can read it by Thursday?

I have two blocks from 101 Patchwork Patterns to share today, and I'll be back in a day or two with the first assembly instructions for our quilt. I chose an all pieced block and an alternate block with a little bit of applique. Whichever you choose to make is fine, and this block will allow us to assemble the first round of our medallion style quilt. The choices are Steps to the Alter or Cherry Basket.

Download Steps to the Alter Pattern


First you need to cut the Piece A green squares in half diagonally. I use the lines on the cutting mat to help me get the cut right on the diagonal by laying the square with the corners on a vertical line and using the 45 degree line to make sure it is straight on the mat.


Next, I lay out the rows needed for half of the block. 


Then I glue baste the squares to each other so I can go to the machine and sew without worrying that squares are out of place.


Next, sew pairs of yellow and green rows together. 

Now make the brown and beige half square triangle unit, and using the other half of the brown square, make the other half of the block. 

At this point you can sew the yellow/green pieces and the beige/brown pieces into rows, or sew each half together. I chose to sew the halves together. As you can see here I pressed the seam allowances open on the yellow/green rows.


Sew the two halves of the block together and you are done. (Sorry, missed a photo of this step.) 

As an improvement I am working on setting up a photography station with better light. I've been checking other blog posts on the issue. These seem to be particularly dark and I apologize.


Download Cherry Basket Pattern


This is very similar to the Steps to the Alter block above. Your small blocks are half square triangles rather than simple squares. 


Sew the rows of the basket together just like you did before. Also, add the dark purple half square triangles to the background rectangles.


Next you'll sew the background/triangle pieces to the basket, first one side then the other. Make sure you have an overlap of the dark purple triangles at the bottom corner of the basket. Sew the half square of background to the bottom of the basket.


After cutting the 8-5/8" large square on the diagonal, press to mark the center. Also fold the applique handle in half and line up the folds when placing the handle. Be sure that the bottom edges of the handle will be caught in the seam allowance.


I used fusible web to trace the basket handle and fuse it to the background triangle. I used a machine blanket stitch to sew it. You can use any stitch you would like: straight, zigzag, blanket, even hand blanket stitching is fine. Whatever you want is what's right.

Sew the handle portion to the basket portion. They are not equal halves like the Steps to the Alter were. Check to make sure you have a 1/4 inch seam allowance on either end of the handle portion extending beyond the basket portion.

Quilt including block 13.

So that wasn't too bad, was it? Remember you only need to make one of the blocks unless you want to have a spare. Each round of the quilt layout uses a different size block to make the dimensions come out right. So the 12 or 13 9 inch blocks we've made will surround the large center block. 

Check back in a couple days for the first assembly instructions.
Thanks for visiting,
Mary

Wednesday, September 14, 2016

The Road Home Row Along - New Milford, Connecticut

Welcome to the Seacoast Quilter! I am enjoying the row along so much. Thanks to Marian of Seams to Be Sew and Amy of Sew Incredibly Crazy for organizing this event. No small task, with 40 participating designers! I'm fairly new at blogging and I'm very grateful I was able to join the fun. I knew right away what I wanted to do. I started with a row that was just the Christmas trees. I decided last week to add the bandstand because it was just too plain. The templates were a challenge, but that's good for you, right?

New Milford, Connecticut
Download Row Here from Google Drive
or find it at Craftsy

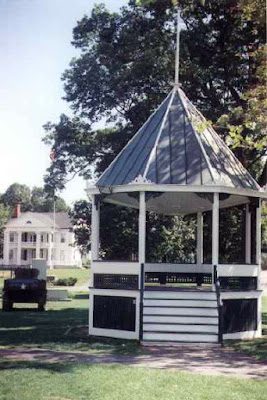
My row depicts the town green at Christmas time. I didn't get a very good photo with my phone but will try to post a better one soon. As a typical New England small town, we have a green in the center. The bandstand is the only structure on the green itself. Trees are set up along the whole length as Christmas approaches.  It's a well known event in the Litchfield County region, and made the cover of Redbook magazine back in the sixties. 


The WWII era tank is another well known feature. 

I was born in, and grew up in New Milford, Connecticut. We had lots of Aunts and Uncles and cousins in town. Saturday nights usually found the whole family at one house or another. And a number of them played instruments so there was always music involved. New Milford was only about 8,000 people when I was a child. It's now about 28,000! I live in the Seacoast region of New Hampshire now.


I took some photos as I made the row. First I used printer friendly pieces of Steam-a-Seam 2 Lite for the applique shapes. Simply printing the pdf template pages is so easy. It has removable paper on both sides. When you remove the first layer it is tacky so you can place your pieces and they stay put. Once you are happy with the arrangement you fuse in place as usual.


I have two methods of joining the sky and the ground fabrics in the pattern. I ironed a fold at the top edge of the ground fabric and applied a fusible tape. This is by Clover to use with their bias tape makers. I then fused the ground to the sky and sewed it together with a blanket stitch.


The next step was to place the applique pieces. For the bandstand, I placed the pattern placement guide under an applique sheet (Bohin Non-Stick Ironing and Craft Sheet),


This allowed me to position all the pieces for the bandstand and fuse them together.


Now I can peel the completed unit off and place it on the background fabric. Adding the lamp posts and trees was simple from here. I usually tack down fusible applique when I quilt but I think I may do something on the bandstand to help define it. Maybe just black thread and "sketch" the details?


Now, to the fun part. Everyone has the opportunity to win one of lots and lots of prizes over the course of this blog hop. Thanks to all the sponsors. Please visit Seams to Be Sew to be entered in the drawing for the Calibre Art cutting mat, and lots of other goodies. To enter the drawing for 5 winners each day of an Anita Goodesign Machine Embroidery CD answer the question in the Rafllecopter widget here. Both of these are for U.S. entrants only.


a Rafflecopter giveaway

If you've just found the Row Along today, no problem. You can visit any of the participants on or after their day to collect rows. Most will be available through the end of October. The schedule for The Road Home Row Along is:


September 6
Allie-Oops Sweet Happy Life creates Harrisville, MI Sunrise Coast
Cynthia’s Creating Ark creates Adelaide South Australia
Kissed Quilts creates Grand Coulee, Washington
Renee’s Quilting Addiction creates Alberta, Canada
September 8
Sew Incredibly Crazy creates Colorado
3 Patch Crafts creates Bulgaria
Just Let Me Quilt creates Las Vegas, Nevada
Quilt in Piece creates Amanzimtoti, South Africa
September 13
Tweety Loves Quilting creates Edinburgh, UK
Quiltscapes creates Heber City, Utah
Seams To Be Sew creates Idaho Falls, Idaho
Pine Valley creates New Zealand
September 15
bdieges designs creates Road to Tehachapi (CA)
Elizabeth Coughlin Designs creates Worcester County in Central Massachusetts
Patti’s Patchwork creates Toronto, Ontario Canada
Seacoast Quilter creates New Milford, Connecticut
September 20
Beaquilter creates Denmark
Heleen Pinkster creates Netherlands
MooseStash Quilting creates Alaska
Rebecca Mae Designs creates Northern Maine
September 22
Words & Stitches creates Beaches of California
Quilt Art creates Africa
I Can Quilt 2 creates Baltimore, MD
Any Pattern creates Port Angeles, Washington
Patchwork Breeze creates West Michigan Shoreline
September 27
Creatin’ in the Sticks creates Dodge City, Kansas
Sue Griffiths Featured At Just Let Me Quilt creates Northern Rivers Region, NSW, Australia
Seams To Be Sew And Batts In The Attic creates Hollywood/LA
(Dual Posting)
September 29
Quilted Fabric Art creates Burlington Vermont
Westend Quilter creates Manitoulin Island, Canada
Pamela Quilts creates Oregon
Quilt Fabrication creates Silicon Valley, CA
October 04
Patchouli Moon Studio creates Central New Mexico
Linda Robertus creates Netherlands
Elm Street Quilts creates North Carolina
Sarah Quinn Featured At Seams To Be Sew creates Outer Space
October 06
Cheryl LaPlant Featured At Quilt In Piece creates York, Maine
Miss Loreen’s Schoolhouse creates New Hampshire
Bumbleberry Stitches creates Oklahoma

Needle in a Hayes Stack creates Mojave Desert
Cloth and Paper Studio creates North Georgia Mountains
October 11
Show N Tell Day
TBA

Thanks for visiting. Please join me on Facebook or sign up for my new e-mail newsletter. I am doing a block a week honoring 101 Patchwork Patterns by Ruby Short McKim. We're only up to block 12 so there's plenty of time to join in.

Thanks,
Mary

Tuesday, September 6, 2016

101 Patchwork Patterns Block 12

Today is the start of The Road Home Row Along. You can see the full schedule here. From what I've seen already today these rows are fabulous. And it's so interesting to see places like Adelaide, Australia, where I never expect to visit. The row along is like the Row by Row Experience, but without all the driving. Visit the 4 or 5 bloggers each Tuesday and Thursday and download their rows. They will remain free until the end of the row along October 11th. Lots of great prizes too. I hope you'll visit and have a tour of "The Road Home." My post will be on September 15th and I've designed a row for my hometown, New Milford, Connecticut.

Now, on to this week's block. This is called the Beggar Block. In looking for any history about the block I found several different blocks with the same name. Also, one theory is that the name comes from quilters begging scraps from friends. It is a block that would lend itself to a scrappy approach.

 Download Beggar Block Pattern

I had a little trouble with making this block. The first time I made the blue pieces from a square and two half square triangles. When sewn together they looked like this:


Next, I put the block together with the pink strips and the beige center square. Unfortunately, with so many seams, the block came out a little off square and too small.

Oh well. So I started again with placing beige squares on each end of a blue rectangle, sewing the diagonal, and trimming.


This approach eliminated 2 seams in each 1-1/2" x 3-1/2" piece, and the block came out much better. I know you end up with a pile of little triangles from trimming, and if they were bigger I would save them, but not these!

One more block to go and we'll be able to put the center of the quilt together. I can't wait to see how it looks. I hope anyone making this quilt will share their blocks. There is a Facebook page at www.facebook.com/SeacoastQuilter/ and a Flikr Album at www.flickr.com/photos/seacoastquilter/

Steady Betty

You may have noticed that I got a new pressing board. I've been using a Steady Betty ironing board that I purchased just before my quilt shop closed in June 2011. As you can see below, it was past time to replace it.


It somehow had a small slice out of it, and the edges were worn down to the board. The surface is a nice foam material that grips your pieces when you are pressing and keeps them from shifting. I think the brown discoloration is from years of starch buildup being ironed into it.

My original board had "Patent Pending" on the label! 


I'm using a pressing cloth when I starch so hopefully it will stay nice for a while and last as long as the first one did. I love ironing, which may be weird, but I do.

Hope you get time at your sewing machine today!
Mary